![]()
![]()
![]()
![]()
![]()
Other Great! Websites:
![]()
![]()


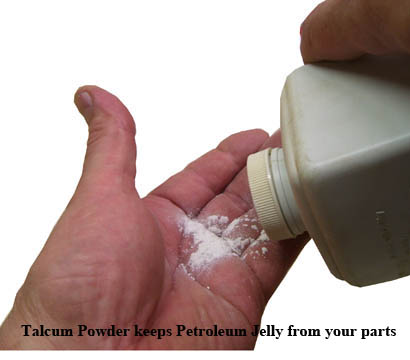
Protect your hands


DHTMLGoodies.com
 Move the parts often while the glue is drying so they don't stick
StairsLanding/Landing04_lg.jpg
Move the parts often while the glue is drying so they don't stick
StairsLanding/Landing04_lg.jpg
Move the parts often while the glue is drying so they don't stick
StairsLanding/Landing04_lg.jpg


DHTMLGoodies.com
 Glue the one glue-spot Newel onto the Liner; adjust the position of the Rail
StairsLanding/Landing20_lg.jpg
Glue the one glue-spot Newel onto the Liner; adjust the position of the Rail
StairsLanding/Landing20_lg.jpg
Glue the one glue-spot Newel onto the Liner; adjust the position of the Rail
StairsLanding/Landing20_lg.jpg
DHTMLGoodies.com
 The two glue-spot Newel overhangs the Liner: the second glue-spot aims down
StairsLanding/Landing21_lg.jpg
The two glue-spot Newel overhangs the Liner: the second glue-spot aims down
StairsLanding/Landing21_lg.jpg
The two glue-spot Newel overhangs the Liner: the second glue-spot aims down
StairsLanding/Landing21_lg.jpg


DHTMLGoodies.com
 The Baluster (Dowel) for the third down step must be cut to line up with the ceiling
StairsLanding/Landing24_lg.jpg
The Baluster (Dowel) for the third down step must be cut to line up with the ceiling
StairsLanding/Landing24_lg.jpg
The Baluster (Dowel) for the third down step must be cut to line up with the ceiling
StairsLanding/Landing24_lg.jpg

DHTMLGoodies.com
 Glue the Dowel to the step and the Stringer (stair-side)
StairsLanding/Landing26_lg.jpg
Glue the Dowel to the step and the Stringer (stair-side)
StairsLanding/Landing26_lg.jpg
Glue the Dowel to the step and the Stringer (stair-side)
StairsLanding/Landing26_lg.jpg


DHTMLGoodies.com
 Glue Dowels to the rest of the steps (not the top 2)
StairsLanding/Landing30_lg.jpg
Glue Dowels to the rest of the steps (not the top 2)
StairsLanding/Landing30_lg.jpg
Glue Dowels to the rest of the steps (not the top 2)
StairsLanding/Landing30_lg.jpg
DHTMLGoodies.com
 Use a small mirror to look straight sideways - line up the dowels with something square
StairsLanding/Landing31_lg.jpg
Use a small mirror to look straight sideways - line up the dowels with something square
StairsLanding/Landing31_lg.jpg
Use a small mirror to look straight sideways - line up the dowels with something square
StairsLanding/Landing31_lg.jpg


DHTMLGoodies.com
 Glue together the Landing Rails: note the Newel's overhang
StairsLanding/Landing34_lg.jpg
Glue together the Landing Rails: note the Newel's overhang
StairsLanding/Landing34_lg.jpg
Glue together the Landing Rails: note the Newel's overhang
StairsLanding/Landing34_lg.jpg

DHTMLGoodies.com
 Adjust: the Liners are lined up on top with the floor
StairsLanding/Landing36_lg.jpg
Adjust: the Liners are lined up on top with the floor
StairsLanding/Landing36_lg.jpg
Adjust: the Liners are lined up on top with the floor
StairsLanding/Landing36_lg.jpg


DHTMLGoodies.com
 Scrape a glue-spot on the Banister Newel (the longer one)
StairsLanding/Landing42_lg.jpg
Scrape a glue-spot on the Banister Newel (the longer one)
StairsLanding/Landing42_lg.jpg
Scrape a glue-spot on the Banister Newel (the longer one)
StairsLanding/Landing42_lg.jpg


