It is usually best to finish a floor before starting construction.Floor finishing is easier and neater when the floor is flat on the table.
For many floors, the extra durability of a finished surface is important protection during the build .
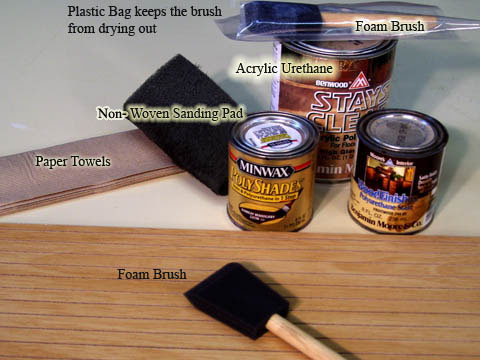
I am a long-time lover of shellac as a clear finish, but technology marches on - my new favorite clear finish is acrylic urethane.
It is tough, clear, easy to use, quick drying, no-fume, water clean-up, and readily available.
I used Shellac for years, it’s hard and fast drying, but alcohol is the solvent which is less friendly to use (needs ventilation), and it is a bit more vulnerable to things that spill. Regular Polyurethane is also excellent, but it takes a day per coat and makes the color slightly honey yellow. It’s a bit cheaper than Acrylic Urethane but uses thinner as a solvent (ThinX is a brand) which is also a ventilation issue.
For all products, wipe off the first coat completely, leaving just what is in the grooves, then (when dry) take off the ‘shine’. Any application that is trying to bead up while it is drying must be brushed out until it begins to get tacky and stops beading up.
All wood fooring
Smooth Plywood
Scored Plywood
Veneer on MDF
Builder-applied flooring
Special considerations: Do all sanding with fine sandpaper
If the surface seems splintery, start the sanding cross-grain to 'roll' off the splinters (rather than catching them and making them bigger)
Do the final sanding with-the-grain
Scored wood-print flooring on MDF
Special considerations:
Do all sanding with a Non-Woven sanding pad (like "ScotchBrite")
Demo below: ClearCoat on wood-print flooring
Click on a photo (below) for a larger picture.
The new window can be re-sized or closed when you are done
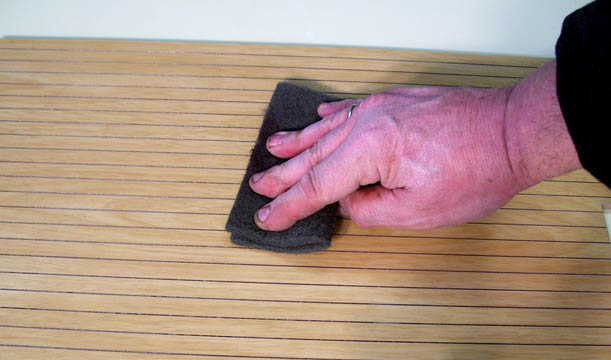
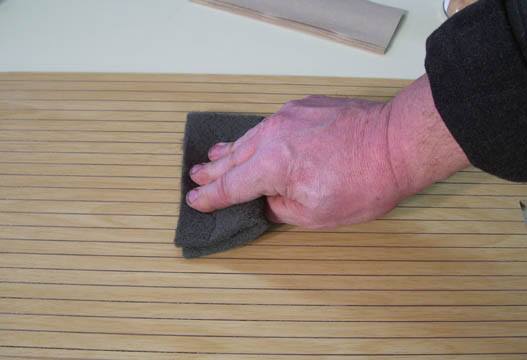
I am gently sanding with a non-woven pad (also called "synthetic steel wool"), circular motion at first, and finishing with-the-grain. The sanding will remove the sheen and smooth the ridges left from scoring the surface - do not sand so much the printing comes off... just the shine!
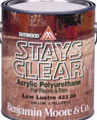
Acrylic Urethane
This is "StaysClear" acrylic urethane... there are many brand names of this product. I am putting it on thick to flood the scoring grooves, then brushing out the surface for the thinnest-possible surface layer.
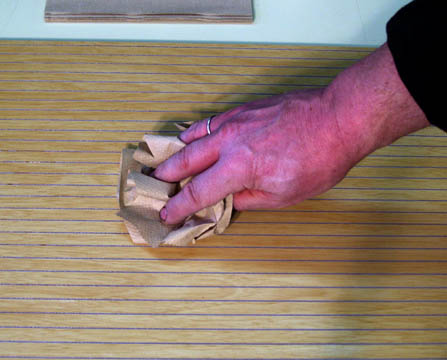
I am wiping excess finish from the surface - too much finish will puddle and bead-up. Wipe in long straight strokes from one end of the floor off the other end; take off all the finish you can.
Continue rubbing or brushing out the finish until it begins to get tacky. Acrylic Urethane is thin and runny... fine for penetrating an open grained surface, but it beads up on the impervious printed surface until some of the straight-out-of-the-can thinness has evaporated. It only takes a few minutes for the acrylic urethane to get tacky so it will stay flat on the surface. If it is beading up, keep rubbing it out or wipe it off completely and de-shine a bit more (but not so much the wood-printing comes off).
In less than an hour it is dry and I can sand the surface with the non-woven pad again or a crumpled paper bag. Sanding leaves no shine and makes the surface feel 'soft' and smooth.
The final coat is thicker for a full, tough finish. Use long, end-to-end strokes - all with the scoring
If the final finish is too glossy, sand it again with the woven pad
to remove the shine and use a paste wax on the surface