![]()
![]()
![]()
![]()
![]()
Other Great! Websites:
![]()
![]()
Baseboard and Crown Molding using the
#J-FK set
 |
| Craft Saw & Miter Box |
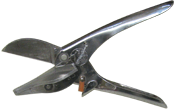 |
| EZ Cutter & Sandpaper |
 |
| Hacksaw & Craft Knife |
DHTMLGoodies.com
 The house is up-side-down for installing Crown
BaseboardCrown/BaseboardCrown60_lg.jpg
The house is up-side-down for installing Crown
BaseboardCrown/BaseboardCrown60_lg.jpg
The house is up-side-down for installing Crown
BaseboardCrown/BaseboardCrown60_lg.jpg

DHTMLGoodies.com
 Keep the back up-and-down as you cut the Crown
BaseboardCrown/BaseboardCrown62_lg.jpg
Keep the back up-and-down as you cut the Crown
BaseboardCrown/BaseboardCrown62_lg.jpg
Keep the back up-and-down as you cut the Crown
BaseboardCrown/BaseboardCrown62_lg.jpg
DHTMLGoodies.com
 Make angled cuts 1/4 from the end so the cut will come out straight
BaseboardCrown/BaseboardCrown63_lg.jpg
Make angled cuts 1/4 from the end so the cut will come out straight
BaseboardCrown/BaseboardCrown63_lg.jpg
Make angled cuts 1/4 from the end so the cut will come out straight
BaseboardCrown/BaseboardCrown63_lg.jpg


DHTMLGoodies.com
 You can't make small cuts with the EZ Cutter
BaseboardCrown/BaseboardCrown70_lg.jpg
You can't make small cuts with the EZ Cutter
BaseboardCrown/BaseboardCrown70_lg.jpg
You can't make small cuts with the EZ Cutter
BaseboardCrown/BaseboardCrown70_lg.jpg


DHTMLGoodies.com
 Miter the end of both side crowns, test, and cut them to length
BaseboardCrown/BaseboardCrown73_lg.jpg
Miter the end of both side crowns, test, and cut them to length
BaseboardCrown/BaseboardCrown73_lg.jpg
Miter the end of both side crowns, test, and cut them to length
BaseboardCrown/BaseboardCrown73_lg.jpg

DHTMLGoodies.com
 Light Spackle on the angled cuts of the side Crown
BaseboardCrown/BaseboardCrown75_lg.jpg
Light Spackle on the angled cuts of the side Crown
BaseboardCrown/BaseboardCrown75_lg.jpg
Light Spackle on the angled cuts of the side Crown
BaseboardCrown/BaseboardCrown75_lg.jpg

DHTMLGoodies.com
 Clean up the spackle squeezings in the middle with the back of the brush
BaseboardCrown/BaseboardCrown77_lg.jpg
Clean up the spackle squeezings in the middle with the back of the brush
BaseboardCrown/BaseboardCrown77_lg.jpg
Clean up the spackle squeezings in the middle with the back of the brush
BaseboardCrown/BaseboardCrown77_lg.jpg
DHTMLGoodies.com
 Clean up the spackle squeezings on top and bottom with the brissles
BaseboardCrown/BaseboardCrown78_lg.jpg
Clean up the spackle squeezings on top and bottom with the brissles
BaseboardCrown/BaseboardCrown78_lg.jpg
Clean up the spackle squeezings on top and bottom with the brissles
BaseboardCrown/BaseboardCrown78_lg.jpg
DHTMLGoodies.com
 Do this for every room except on the Stairs' wall.
BaseboardCrown/BaseboardCrown79_lg.jpg
Do this for every room except on the Stairs' wall.
BaseboardCrown/BaseboardCrown79_lg.jpg
Do this for every room except on the Stairs' wall.
BaseboardCrown/BaseboardCrown79_lg.jpg


DHTMLGoodies.com
 When the back edge is square the cut is straight
BaseboardCrown/BaseboardCrown83_lg.jpg
When the back edge is square the cut is straight
BaseboardCrown/BaseboardCrown83_lg.jpg
When the back edge is square the cut is straight
BaseboardCrown/BaseboardCrown83_lg.jpg

DHTMLGoodies.com
 Hold the molding flat, lined up with the "square cut" line
BaseboardCrown/BaseboardCrown85_lg.jpg
Hold the molding flat, lined up with the "square cut" line
BaseboardCrown/BaseboardCrown85_lg.jpg
Hold the molding flat, lined up with the "square cut" line
BaseboardCrown/BaseboardCrown85_lg.jpg


DHTMLGoodies.com
 Sand if necessary - don't change the 45 degree angle
BaseboardCrown/BaseboardCrown88_lg.jpg
Sand if necessary - don't change the 45 degree angle
BaseboardCrown/BaseboardCrown88_lg.jpg
Sand if necessary - don't change the 45 degree angle
BaseboardCrown/BaseboardCrown88_lg.jpg

DHTMLGoodies.com
 Miter, then cut-to-length the side baseboards
BaseboardCrown/BaseboardCrown90_lg.jpg
Miter, then cut-to-length the side baseboards
BaseboardCrown/BaseboardCrown90_lg.jpg
Miter, then cut-to-length the side baseboards
BaseboardCrown/BaseboardCrown90_lg.jpg
DHTMLGoodies.com
 Cut and attach all the baseboard (except at the stairs)
BaseboardCrown/BaseboardCrown91_lg.jpg
Cut and attach all the baseboard (except at the stairs)
BaseboardCrown/BaseboardCrown91_lg.jpg
Cut and attach all the baseboard (except at the stairs)
BaseboardCrown/BaseboardCrown91_lg.jpg
