![]()
![]()
Customizing 1
Customizing 2
Customizing 3 here
Customizing 4
Customizing 5
Customizing 6
When I played with the miniatures in Customizing a Victoria’s Farmhouse, part 1, I made a floorplan with a bathroom on the second floor. That uses up the doorway in the second floor divider, so I have some Divider Customization to do for a new door into the Master Bedroom.
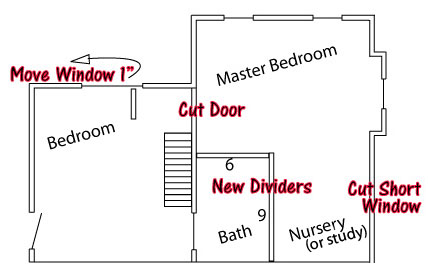

The “New Dividers” are easy… I have a shop and piles of material to work with. I cut a 6 x 9 divider and a 9 x 9 divider for the bathroom. [Customizing Pack].


Putting a doorway at the top of the Stairs is a squeeze. The regular door-placement in a divider puts the door over the staircase (‘don’t want those mini folks falling down the stairs!), so I’ll put the door cutout at the edge of the divider, and will modify the door trim to make it fit. The door frame will bring the opening back another 1/4″ or so, and will put it over the top step (which is part of the floor surface), so my minifolks will be safe!

I traced a door cutout onto the divider and made the first cuts straight up-and-down with a utility knife, several gentle cuts so I can follow the line. Then a clearing cut with the knife at an angle to remove a “V” of material. More straight cuts, more clearing cuts, lots of little cuts until I am all the way through. Here's a page of details.


To install the Divider, I put glue all the way around, tip the divider until it is about 3/4″ from the front, then lift the floor above, tip the divider upright, and push it the rest of the way in. I’ll put in the other divider and the attic partition, but not the bathroom dividers yet. Then I’ll finish wiring.
I’ve got work to do
Gary