
Paint/stain the door and frame before re-assembly
(step 15)
Working Windows Q&A
6010 sidelight door
1011 double Fench door
1015 interior door reverse
1015 Trim
1015 Trim Re-Size
|
DHTMLGoodies.com
 05. Using your finger as a guide, mark the hole's spacing from the back
05D.png
05. Using your finger as a guide, mark the hole's spacing from the back
05D.png
DHTMLGoodies.com
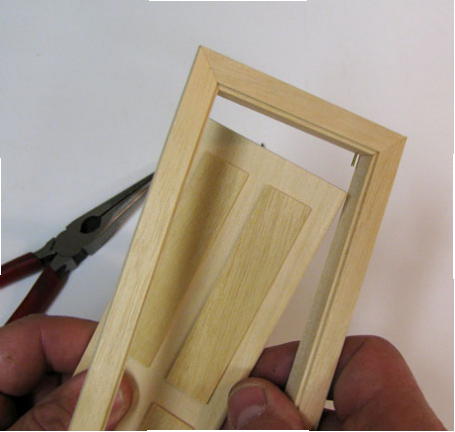
 08a. slide the plyers until they exactly fill the space to the frame
08D.png
08a. slide the plyers until they exactly fill the space to the frame
08D.png
DHTMLGoodies.com
 10. Push the nail through with a waste support behind the frame
10D.png
10. Push the nail through with a waste support behind the frame
10D.png
DHTMLGoodies.com
 11. repeat for the top pin, but use the nail again (it's pointed)
11D.png
11. repeat for the top pin, but use the nail again (it's pointed)
11D.png
DHTMLGoodies.com
 12. The needle nosed plyers' jaw thickness finds the spacing
12D.png
12. The needle nosed plyers' jaw thickness finds the spacing
12D.png
DHTMLGoodies.com
 13. the thickness transfers that spacing to the other side
13D.png
13. the thickness transfers that spacing to the other side
13D.png
DHTMLGoodies.com
 14. Push the nail into the frame (it doesn't have to go all the way through)
14D.png
14. Push the nail into the frame (it doesn't have to go all the way through)
14D.png
DHTMLGoodies.com
 17. Tip the door into the opening with the pin in the hole
17D.png
17. Tip the door into the opening with the pin in the hole
17D.png
|


